Jay's Engineering Journal

    Reilly Reese

    #1 Top Forum Poster & Raiben Jackpot Winner
    Joined
    Oct 13, 2013
    Messages
    5,140
    Reaction score
    1,365
    • Legacy Citizen 8
    • Thinking Positive
    • Purchased!
    engines would be better as ice crystal and then having blast doors appear over the engines to have them turn off.
     

    jayman38

    Precentor-Primus, pro-tempore
    Joined
    Jul 13, 2014
    Messages
    2,518
    Reaction score
    787
    • Purchased!
    • Thinking Positive
    • Legacy Citizen 4
    Your encouragements are unexpected and very inspiring. Thank you.
    I am using AutoCAD to designing my ships.

    P.S I Love your Journal, just awesome! Make a youtube channel and show your marvels in videos! :D
    Wow, AutoCAD is some serious stuff! That's pretty amazing! Thank you for your encouragement. It means worlds to me. I'm currently looking for good video capture software that will work under Linux to enable Youtube uploads, including OBS and FFMpeg. Thank you!

    to get the gif/webm to be shown here on the forums you can simply replace webm with gif in the link.
    https://i.imgur.com/e4C2RDR.webm to https://i.imgur.com/e4C2RDR.gif
    (spoiler image)
    Thank you so much for the great tip! I've updated my post to show the actual GIF. I was originally posting very late at night and lost patience to research the correct way to post an animated GIF from Imgur.

    engines would be better as ice crystal and then having blast doors appear over the engines to have them turn off.
    Great suggestion! Ice crystal or something similar will give a good plasma texture and/or glow without having light-block seams.
    Blast doors are too grey for my taste in this case. I plan to stay with plex door to give it a darker, deactivated look when retracted and covered.

    Thanks guys.
     

    jayman38

    Precentor-Primus, pro-tempore
    Joined
    Jul 13, 2014
    Messages
    2,518
    Reaction score
    787
    • Purchased!
    • Thinking Positive
    • Legacy Citizen 4
    Charity work, as well as the day-to-day grind, is keeping me away from StarMade. My priorities are clearly mixed up.

    Talk of the new YT-1930 ship from Star Wars got me interested, so I looked at some artwork. Very interesting ship. However, I figured it was kind-of too spindly to make a good StarMade ship. However, after laying it down and drawing over it with some basic ideas, and generally making it a bit larger than the plans call for, due to 1m blocks, I think it will make a fine RP ship in StarMade. According to my ideas for modifications, it will actually be very closely related to my latest Aluminum Mallard update, but without the rotating engine pods and about 6 times the size.

    The twin forward hulls will need to be 3m thick instead of 2m. (definitely bigger than a womp-rat.) Everything else seems to line up surprisingly well, when drawing 2D blocks onto a blueprint image.

    yt1930plansample1.png
    Illustration 1: a side-view overlay. The barely-recognizable octogon represents the side hatchway, with a 3x3 door, and room above and below for USB (docking hatch variety) standard connections.
    The horizontally-hatched dark grey elements represent Plex-door simulated landing gear. The vertically-hatched line represents a line of thruster blocks sandwiched between hull as the forward twin hulls. The extra rectangle frame below the octogon hatchway represents a dropping platform to replace the standard downward-rotating entry ramp. This is the element shared with the Aluminum Mallard, turned sideways.


    yt1930plansample2.png
    Illustration 2: A top-view overlay. The forward twin hull wings take on a much more recognizable shape here. vertically-hatched elements represent thruster blocks exposed in the hull, to simulate those point-of-interest greebles. Two small groups on each of the forward hull-wings. Two larger ones towards the back of the ship on top of the larger hull. There's also a few exposed thruster blocks on the engine pods close to the center of the inset rear of the ship. Horizontally-hatched groups represent hatches in the top of the hull, complete with docking-USB areas surrounding them.

    yt1930plansample3.png
    Illustration 3: a front view overlay showing the starboard forward hull-wing. The white block at the hull-wing's tip represents a good ole-fashioned light block. The blue block next to it represents a cannon or missile launcher sandwiched within the hullwing. The vertically-hatched blocks running away from the light block represent exposed thruster blocks. The thruster texture on the front and sides of the blocks should make the design look very Star-Wars-y. The dark-grey represents the plex-door landing gear and landing gear hatches and will be both at the front and back of the ship for balance. Peeking out behind the landing gear is a view of the dropping platform that replaces the boarding ramp. It is located mid-ship, aligned with the octagonal hatchway. At the far edge of the picture, is one of the struts of the cargo bay dropping ramp, located towards the back of the ship.
     

    jayman38

    Precentor-Primus, pro-tempore
    Joined
    Jul 13, 2014
    Messages
    2,518
    Reaction score
    787
    • Purchased!
    • Thinking Positive
    • Legacy Citizen 4
    Was hoping to get some design work done in StarMade itself. Weekend got busy. No real StarMade work got done.

    Tried to access the controls on my updated Aluminum Mallard to create an animated GIF of the moving parts in action. Totally caught off-guard when the logic failed to do anything. The control that directly "activates" the plex-door landing gear to cause it to disappear worked, and the rail that is supposed to guide the ramp up and down switched direction correctly, but the ramp and the engine pods won't move anymore. I tested to make sure the connected elements (ramp and engine pods) were still connected. They won't move or even jiggle in place, suggesting that they are still attached to the core structure. I think I read somewhere that the logic connections were completely broken in a recent update, and that I would not only need to re-link everything, but actually remove and replace all the logic blocks. It's not that complex, but I don't know if I remember enough about the logic setup to recreate it. In any case, it will take more time just to get back to where I was. Irritating.
     

    jayman38

    Precentor-Primus, pro-tempore
    Joined
    Jul 13, 2014
    Messages
    2,518
    Reaction score
    787
    • Purchased!
    • Thinking Positive
    • Legacy Citizen 4
    Special Starmade design project suspended for a while. I simply felt the YT1930 design pulling at me, so I went back to that for a while. I wanted to create a ship "playset" in the style of the toys I played with as a kid. As a result, my YT1930 has 18 or 20 rail attachments, not including the two pd turrets. (Yes, I know the original design only calls for a turret on top, but it's foolhardy to leave the belly exposed to missiles.) In order to accommodate the StarMade scale of things, this YT1930 is 2:1 scale of the original blueprint I found online. However, the meter may be quite a bit bigger, or people are quite a bit smaller in a galaxy far, far away. I have a whole new appreciation for toy designers after working on my "playset".

    yt1930starboard34elevation_tiny.png
    Illustration 1: Beauty shot of the external view. No PD turrets attached yet. Some changes were made later to minor details, but it mostly looks the same. Thruster blocks used in the hull on the top and bottom of the ship, especially where the blueprints show "holes" or maintenance access points in the hull.

    Technically, the landing system provides just barely enough room for the ventral pd turret to stay in place, assuming it is in the fully locked and upright position (default position). However, that wasn't good enough for me, so I created a turret platform that recesses into the hull a distance of two blocks, to ensure there is comfortable room. Now an astronaut can walk under the pd turret when the ship is landed on its landing gear. (Ironically, made out of plex door and blast door instead of rail entities, simply because the internal space is running out of room.)

    In the current configuration, the cargo bays are a little smaller than the blueprints normally show. (Typical internal layouts show that the large spaces in the rear of the craft appear to be almost totally hollow. Where are all the systems? In the cargo clamps? There's simply no room.) However, even at approximately half the size, there is still plenty of open space in my cargo bays, including an operational rail ramp, as shown below.

    yt1930cargorampport_tiny.png
    Illustration 2: Cargo Bay Ramp, designed to extend all the way to the "floor" when the landing gear is down. (It can all sit on a flat deck.) Includes 4 rails for docking cargo pods, and a gravity block in the center, to make sure you aren't left behind when retracting the ramp into the ship. The ramp also includes a wireless control button for retracting the ramp without requiring an operator inside the ship.

    yt1930cargobayport_tiny.png
    Illustration 3: The rest of the cavernous cargo bay, as seen from the cargo bay ramp. The alcove in the lower right at the far wall is the short hall leading to the rest of the ship through a rail-driven door.

    The tricky part is getting so many rail systems into a single ship. A typical rail system requires an average of 8 blocks of logic control, including a pair of diametrically opposed rails, to control direction along one axis. (typically up/down or forward/backward) The airlocks midship on either side of the freighter were my favorite, most time-consuming rail systems. It includes a two-part rail ramp that lowers to the ground (in place of a Star-Wars-standard downward-rotating ramp) plus a vertical airlock elevator (the kind used by Lando Calrissian at the end of the Empire Strikes Back, to pull a wounded Luke Skywalker into the Millenium Falcon) which doubles as the ramp down from the ship's interior down onto the one-block-lower floor of the two-part rail ramp. No wonder I needed a double-scale ship! However, when you wander around inside, the scale seems normal. Almost cramped.

    yt1930airlockport_tiny.png
    Illustration 4: Port-side airlock area, viewed from the outer door. The far side has a conventional blast-door-block door. The ramp leading down from that is the vertical airlock elevator and actually moves up to the top of the ship when activated, going through automatically-opened doorways. The vertical elevator stops two blocks short of the roof, protecting the riders and to give space for a control switch to allow the rider to bring the elevator back down without needing another operator working the ramp inside the ship. The lower ramp can be seen with the single rail block, where additional cargo can be loaded. This lower ramp actually comes in two parts, both lowering or raising at the same time, to allow the ramp to reach all the way to the "floor" where the landing gear reach and raising all the way up back into the ship when retracted.

    As part of "completeness", I added some unnecessary but fun details. Namely, one living/bed room and one bathroom/medical area on either side of the ship, forward of the side airlocks. Each of those rooms has its own spiffy rail-driven entrance door. Possibly good for machinima or just if you want this ship to feel like a home. The bedrooms even have a lightswitch that illuminates when the lights are off so that the switch is easier to find in the dark.

    However, speaking of completeness, now that I feel the rail systems are all complete, I now need to focus on completing the internal system block placement. The ship can move around due to the thruster blocks in the hull, and has a tiny pair of missile launchers (can be linked for a guided missile) in the forward cargo clamps, but that's about it. I plan to install a "hyperdrive", the computer of which is already front-and-center in the cockpit (similar to the location that Han Solo would always reach for when activing his hyperdrive. The ship basically needs more power generation and shielding, to upgrade it from a paper playset to a plastic playset. It will still be melted by a better ship, very easily.
     
    • Like
    Reactions: Rumcajz

    jayman38

    Precentor-Primus, pro-tempore
    Joined
    Jul 13, 2014
    Messages
    2,518
    Reaction score
    787
    • Purchased!
    • Thinking Positive
    • Legacy Citizen 4
    The Y1930 "J Series" has now been submitted to Community Content for approval. It should be fun for Star Wars fans. As a StarMade Ship, it's pure style over substance; you can really see the Millenium-Falcon-inspired designs throughout. I am happy with this playset. While building the exterior, I found that the rear looked just like the rear end of an X-Wing fighter, so it got a design similarity from that, but I think that similar design was accidental and coincidental.

    yt1930final34external_tiny.png
    Illustration 1: The Final External View.

    This ship marks not only extensive use of the rail systems for RP and machinima purposes, but it also features the first passive effect system I have ever implemented: Stop effect for the ability to hover in gravity. I thought this would be good for not only machinima, but also for good landing effects. I wasn't sure how the effect ratios worked, so I put in an excess of stop modules. The effect reads 100% effect when active, so I think I put in too many. The ship is designed to rest flat on its landing gear, and the ramps are designed to drop down to the same floor elevation as the landing gear. When retracted, the ramps are hidden behind blast doors to make it look nice.

    yt1930j1_statistics_cropped.png
    Illustration 2: Final Statistics for the ship's size and performance

    I found some official-looking blueprints online of a different internal layout, so I plan to build and release a second version with this more official internal layout before the end of the year. The official internal layouts don't leave much room for systems, so version 2 will be even weaker than version 1 in terms of StarMade playability. However, it should be literally more open for RP playability.

    It may take some time to be approved for general release, but here is the Community Content link for the YT1930, J Series:

    http://starmadedock.net/content/star-wars-yt1930-light-freighter-j-series.3478/

    Edit: Version 1 is now available for download in Community Content.
     
    Last edited:
    • Like
    Reactions: Rumcajz

    jayman38

    Precentor-Primus, pro-tempore
    Joined
    Jul 13, 2014
    Messages
    2,518
    Reaction score
    787
    • Purchased!
    • Thinking Positive
    • Legacy Citizen 4
    So I found a more official-looking blueprint for internal spaces for the YT-1930 online, and thought I'd create a new version of this ship with the shell of my first version.

    The internal blueprint included lots of rounded areas. Naturally, I redesigned those to be more StarMade-y with 45 degree angles instead.

    starwars-yt1930_old_internal_blueprint1_sample1.png

    Fortunately, these blueprints included some stuff like bunks and walls locked at 45 degree angles. Superb.

    Resulting Master Bedroom for the captain:

    yt1930_masterquarters_tiny.png

    Lots of space wasted to wedges, but it's an RP build, so waste is perfectly acceptable. The Guest quarters ended up with a little less waste and more grid alignment.

    yt1930_guestquarters_tiny.png

    On a more technical note, I tried putting in an antigravity system with the Stop effect, but could only get it up to about 40-45% efficiency, so the ship can still drop out of the sky if you aren't careful. I'm hoping the ship will be a little easier to land now. The Thrust-mass ratio will be closer to 1:1 rather than 1.5:1

    Due to the updated blueprints, the cargo bay is even more cavernous now. An enterprising captain could use the extra space for additional systems, like more jump drive cells for a faster Hyperdrive (tm) recharge, more stop modules for 100% antigravity efficiency, more thrusters, or a scanner. In each cargo bay, there is a single unsightly logic pipe running across the ceiling. I'm hoping that it makes the cargo bay look a little more industrial and slightly less boring. I have almost all other pipes hidden in the structure. There's a few visible dots that show a tiny sliver of a logic pipe on each side of the room in the dorsal entry hall, but they almost look like system lights because there is so little showing. I want to add some docking options directly to the cargo sections, and maybe see if I can eliminate some of the superfluous external cameras. Each cargo bay has it's own security camera now, so the pilot can monitor each cargo bay. The primary purpose is actually for testing that the cargo ramps still work. They do, including the manual wireless activation button on the ramp itself.

    The new blueprints has thin walls and doors, so the rail doors have been taken out completely. More conventional plex doors, especially the wedged ones, now serve as the primary door type.

    There have been some design decisions that reduce the effectiveness of the ship in favor of being familiar to the lore of Star Wars. Namely, the biggest design for this is the power-monitoring doors in the floor at the base of the ramp leading up to the cockpit. In the uploaded design, these doors, when opened will show a large bank of power capacitors. An enterprising smuggler could remove this bank and replace it with.... say.... a small smuggling compartment, like the kind shown in Episode IV: A New Hope.

    When the internal main light system is on (it normally should be, unless you prefer a moodier ship interior) and the landing gear is down, the new version will have some spiffy "parking lights" on the bottom of the ship to help keep it illuminated while grounded. Nothing special. You just expect a ship to be lit underneath when landed. So that should look a little nicer and less gloomy when landed. There is some hidden logic that ensures that the parking lights will be turned off if the ship goes either to flight mode (turning off the landing cycle) or turning off the main hall lights. (That button is very close to the ship core and has a descriptive display panel over it, so it should be easy to find and use.)

    Nov 7th update:
    The new version 2 has been finished and uploaded to the Community Content and is currently awaiting approval for general release.

    Some additional details that I don't mind releasing now:

    yt1930_j2_34elevation_tiny.png
    Illustration 4: a small view of the new Version 2 exterior, including the now-all-plexdoor access doors. Looks largely similar to Version 1.

    yt1930_j2_hudviewfromcore_tiny.png
    Illustration 5: The view from the ship core. Not very useful.

    yt1930_j2_hudviewfromfrontcam_tiny.png
    Illustration 6: The same old view from the forward camera. No transparent crystal armor, so it's more vulnerable, but now you can see the missiles firing.

    yt1930_j2_hudviewfromcargocamera_tiny.png
    Illustration 7: In this new layout, the cargo bays are even bigger! But the cargo elevator ramps remain the same. The control logic has been moved. Now there is a logic pipe stretching across the ceiling.

    yt1930_j2_dish_dock_tiny.png
    Illustration 8: The Version 2 exterior includes two rotational docking points, in case you wanted to add a radar/scanner dish to the exterior. I have left it off to provide maximum field of fire for the dorsal PD turret.

    yt1930_j2_parkinglights_tiny.png
    Illustration 9: The Version 2 exterior now includes "parking lights" when the main hall lights are on inside, and the landing cycle is active. The lights really make it look nice when you use the ramps. The lights turn off during flight mode.
     

    Attachments

    Last edited:
    • Like
    Reactions: Rumcajz

    jayman38

    Precentor-Primus, pro-tempore
    Joined
    Jul 13, 2014
    Messages
    2,518
    Reaction score
    787
    • Purchased!
    • Thinking Positive
    • Legacy Citizen 4
    Worked on a space station with a Babylon 5/6 theme. Was going to make it much bigger, but limited time available continually reduced the scope to mere fractions of the original scale. Original scale: ~4 km length. It's now about a third of the final length, as far as scaled systems, which means that it is built to approximately 1/5 scale. Wow! I can only imagine if I were going to build something so big....

    babel6_spacestation_96x96.png

    I was originally going to use modular "rooms" with docking mechanics for a modular, easily-expanded and -modified approach. It worked spectacularly well for the transport rooms. Since most of the other rooms were singletons, due to the reduced scale of the overall structure, it would have been more efficient to build them straight into the structure instead of building them as separate ships and docking them. However, the theory is sound.

    Based on what I've read, it will be important in the future to attach speed-control blocks to docking blocks, and setting the speed to zero, to bypass physics calculations, making the docked entity more unified with the host structure.

    My attempt to create large structures with tiered docking was a spectacular success. Specifically, I created a basic rotation ring with four docking points, and then created "walls" with one regular side and one diagonal side to attach to each of the four docking points, creating a completely enclosed octogonal area. I left the "mouth" open to allow entry and exit to visiting ships.

    The rotational motion worked great. I wasn't sure if it would get stuck often, so on the edge of my structures where they move together, I left a layer of plex door that can be "opened" all at once, to allow the structure to continue moving. It should then be fine to "close" the plex door again, once the docked structure can move. The movement worked so well in the first place, that I have not needed to test the plex door "brush" idea at all.


    Final stats:
    babel6_19522_1_stats_1.png

    Community Content entry:
    https://starmadedock.net/content/babel-6-space-station.4012/
     
    • Like
    Reactions: Rumcajz

    jayman38

    Precentor-Primus, pro-tempore
    Joined
    Jul 13, 2014
    Messages
    2,518
    Reaction score
    787
    • Purchased!
    • Thinking Positive
    • Legacy Citizen 4
    A quick update to the Leopard Dropship in StarMade version 0.19522.

    Leopard Dropship

    I gave her 100% stop effect, so she can hover for dropping in a combat zone and quickly jet off again. It's got more than a 2:1 thrust/mass ratio, so it should be able to move around quick enough.

    The shape is now much closer to the original design, now that I don't have to accommodate giant cube docking areas within the holding area. Of course, any mechs she carries might have to stoop to fit.

    The aerospace hanger still has conventional plex doors, but the mechbay doors are now gull-wing rotor-rail doors, with built-in backup plex doors for emergency exits.

    Due to the updated shape, the retractable stabilizer wings were removed, and the engines include nice blisters now.

    leopard_leftside_angleshot2.png
     

    Attachments

    • Like
    Reactions: Rumcajz

    jayman38

    Precentor-Primus, pro-tempore
    Joined
    Jul 13, 2014
    Messages
    2,518
    Reaction score
    787
    • Purchased!
    • Thinking Positive
    • Legacy Citizen 4
    It's nearly ready. After many long months, I have been putting together my presentation for the Typhoon Submarine recreation. I'm very happy with the build. I didn't want to write about it until now, because I didn't want anyone to beat me to the punch and build their own. My build would then immediately be diminished as a lesser build, even though I have been working on it a long time.

    I actually built a second Typhoon after the first one drifted out of the safety zone of the spawn sector and attracted the attention of pirates. I never could repair all the blocks, so I simply started over. This second rendition is somewhat superior in design.

    An early production picture of the second Typhoon:
    typhoon2_progress2_small.png
    The top of the rear of the Typhoon's outer hull, complete with a water line.

    More to come soon.

    Edit:
    The Typhoon is now available for download if you wanted to play with it. Or just to see it.

    Some more production pictures:
    typhoon2_progress3_small.png
    Work completing the underside of the outer rear hull

    typhoon2_progress4_missile_doors_small.png Work done on the forward deck, primarily the forward deck hatch in front of the sail and the 20 simulated missile doors in front of that.

    typhoon2_progress5_nose_front_small.png The nose without a docking block, but with the water line wrapped all the way around and the four torpedo outer doors showing.

    typhoon2_submarine_stats_cut.png
    The completed ship's stat card.
     
    Last edited:
    • Like
    Reactions: Gasboy

    jayman38

    Precentor-Primus, pro-tempore
    Joined
    Jul 13, 2014
    Messages
    2,518
    Reaction score
    787
    • Purchased!
    • Thinking Positive
    • Legacy Citizen 4
    If you haven't seen it, the subreddit "ImaginaryStarships" is pretty amazing. Just look at this recent animation submission. (Usually, they are static images, but still, they are generally breath-taking.)


    Incredible artistry.

    I'm currently working on a new "spaceplane"-style Battletech Dropship. That's fun. I'll keep in touch with the Battletech rules, which means no shields and no jump drive on a dropship. So I am making it double-armored. Power generation will be low, but there should be some good power storage. I would put in more power generation if I could, but I am keeping the reactor blocks away from the outer skin, which greatly reduces the space into which it can be placed, especially with thicker armor in the nose and internal RP space.
     

    jayman38

    Precentor-Primus, pro-tempore
    Joined
    Jul 13, 2014
    Messages
    2,518
    Reaction score
    787
    • Purchased!
    • Thinking Positive
    • Legacy Citizen 4
    I've recently been getting back to playing Privateer Remake (on Linux), which is a mod of the Privateer Gemini Gold mod of the Vega Strike engine, and the player-accessible ships in that game are so wonderfully angular and chunky that it makes them excellent candidates for Starmade builds.

    I have been working on the first ship in Starmade, the venerable Tarsus. Yes, this is actually the first ship you get when you start the Privateer game. The challenge is all the many, many pipes on the Tarsus. I found a source online that described the Tarsus as 185 feet long, so I directly converted the length to about 56 meters, in Starmade, 56 blocks to be at-scale, scaled the pictures of the ship I found online to that scale, scaled it a bit wider than the standard model, and more like the VDU indicator to give it more internal space and to make the different features make more sense. The online source mentioned above indicated a width of 90 feet (approximately 27m), but I only felt comfortable fattening it out to 23 m instead.

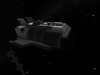
    The original Tarsus has some non-45-degree angles. I like those, but you can't really re-create those angles without weird constructs or looking like a ridiculous jagged pattern. Therefore, I re-designed the shape of the ship to use 45 degree angles, with a focus on maximizing the internal volume. Therefore, the 45 degree chamfers are at the edges of the ship. And there is a large amount of straight "walls". And as it turns out, that looks fine. The ship is still definitely recognizable as a Tarsus, and looks surprisingly good, using 45-degree-divisible angles.

    One of the most challenging pipes on the ship is the dorsal piping directly behind the cockpit. Where does the cockpit door lead? There's a tiny, tiny area behind the cockpit door before the dorsal pipe, and there's really nowhere to go in Starmade recreation of the Tarsus, such as a walkway down to lower levels. The solution? I use the center Dorsal Pipe as a long corridor for the player to walk between the cockpit and the rest of the ship.

    Tarsus_Multiview_DorsalPiping.png VSsweetTarsus_DorsalPiping.png wcprivateer_tarsus_DorsalPiping.png

    There's a bit of space directly behind the cockpit before you reach the pipes. Here in this relatively tiny space, I placed an additional access to the core across from a tiny supply closet with a single cargo computer, and doors to a pair of tiny half-baths. (Boys on the right, girls on the left?) The space available is not enough to create a walkway down to lower levels in the ship, especially if you intend to implement safety features, such as simple guard rails and lighting.

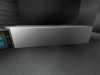
    Anyway, back to the dorsal piping. With little-to-no round elements, the Starmade piping is rather angular itself. Behold.

    wcu_tarsus_DorsalPiping_Small.png

    There are some other features that I think came out well on the Starmade Tarsus.

    I'm rather proud of the rocket nozzles, compared with the smooth tapering of the rocket nozzles in the original Privateer. In short, I think I did the best I could. When actively applying thrust, the thruster plumes should look great. As always, I tried to design them to maximize internal volume.

    wcu_tarsus_LargeRocketNozzle_Small.png
    wcu_tarsus_MediumRocketNozzle_Small.png

    With the smaller pipes, Starmade Pipes were really useful. There is not really anything to make two-meter wide pipes, so I built the two-meter pipes as multiple Starmade pipes lined up together.

    wcu_tarsus_VentralPiping_Small.png

    In that case, the Starmade Pipes represented a smaller 2-m pipe directly underneath a 3-m pipe segment, embedded into the hull. At first, I didn't think the 2-meter wide greeble would work, since it seems to overhang (or is that under-hang) under the hull. However, the embedded 3m pipe in the hull made it work, eliminating the overhang/under-hang. Perfect.

    I'm wondering if I should link a yellow light to the core for the thruster output, or leave it as the default color. I need to check it out.

    With the chunkier Tarsus design, the Tarsus cockpit is every bit as big as the Galaxy cockpit. (Yes, I'm going to be building the Galaxy cargo ship from Privateer next, and planning has already commenced.)

    I'm trying to design the internals of the Tarsus to be well-lit and to feel fairly homely and welcoming. So I'm hoping it will feel internally like a cross between the "Eagle 5" flying Winnebago from "Spaceballs", the Millenium Falcon, which is basically the original "Privateer" cargo ship archetype, and the "Serenity" Firefly-class cargo ship from "Firefly". In opposition to that friendly feel, I have found that the levels below the control deck will have to be a short little 2-m high floor plan. So residents of this ship will be strongly encouraged by a sense of claustrophobia to remain on duty in the cockpit, if only to feel less like they are buried in a tight, metal coffin in a hostile void.
     
    • Like
    Reactions: darknassius

    DrTarDIS

    Eldrich Timelord
    Joined
    Jan 16, 2014
    Messages
    1,114
    Reaction score
    310
    HA! Nice! WC:P Is still one of my all-time fave games. I never could finish it's storyline though. I always got lost taking "uncharted" jumps into kilrathi space and playing at space-eugenics.
    I also chose the tarsus for my "Only needs scrap" challenge build. Take a look if you're interested in comparing notes.
     

    Attachments

    • Like
    Reactions: jayman38

    jayman38

    Precentor-Primus, pro-tempore
    Joined
    Jul 13, 2014
    Messages
    2,518
    Reaction score
    787
    • Purchased!
    • Thinking Positive
    • Legacy Citizen 4
    I never knew just how much I loved disc planets until I saw a screenshot of a modern one from a distance.


    That is great. It's like a dodecahedron planet with an industrial-strength orbiting planetary disc. Then you approach and it "poiks" into a standard 1-sided cookie planet.

    I've got the single repeater-laser installed on my Tarsus prototype. I think it fires a little too rapidly and is much weaker than I originally planned. Even with mostly using regular armor on the hull, versus advanced armor, and having a nominal amount of system blocks inside the ship for basic operations, my Tarsus still needs an annoyingly large number of thruster blocks to have a 1:1 mass:thrust ratio. Of course, I wanted the ship to be graceful in atmospheres, so I have also given the ship 100% stop effect, so one can hover about if they wish. All this, and I wanted an expansive interior, where the player could walk around in almost all interior spaces. I think I struck a pretty decent balance. I'm getting closer. Now I need to properly document it in-game with a full-burn fly-by, an external sweeping view, and an internal walk through of the astronaut spaces. It's just a bunch of extra work to make an unappreciated ship noticeable on the Community Content as worth a download. It will get a bunch of criticism for not being what it was never meant to be. I need to psych myself up to finish the documentation and release the ship to CC before I completely shut down with despair.


    jayman38

    Precentor-Primus, pro-tempore
    Joined
    Jul 13, 2014
    Messages
    2,518
    Reaction score
    787
    • Purchased!
    • Thinking Positive
    • Legacy Citizen 4
    I didn't get the full-burn fly-by video that I wanted to make, but I now have the interior and exterior tours ready on Youtube for my "Tarsus" build, and have uploaded it to Community Content. Now it's just a matter of time before it is approved. At least I finished before the end of the year was up? :whistle:

    Original from Privateer with modern modeling techniques:
    VSsweetTarsus1.png

    My Tarsus recreation in Starmade with voxel techniques:
    tarsus_close_natural.png

    Whee. I'm done with this project. I have a sense of pride and accomplishment, without spending a dime on microtransactions.
     
    • Like
    Reactions: JimmyJamba